智能停车检测与CNN训练
定期检查和调整训练计划,避免训练效果停滞。 #生活常识# #日常生活小窍门# #运动健身建议# #力量训练建议#
一、分割图像得到样本(这一步至关重要)学习:https://deeplearninganalytics.org/blog/page/4
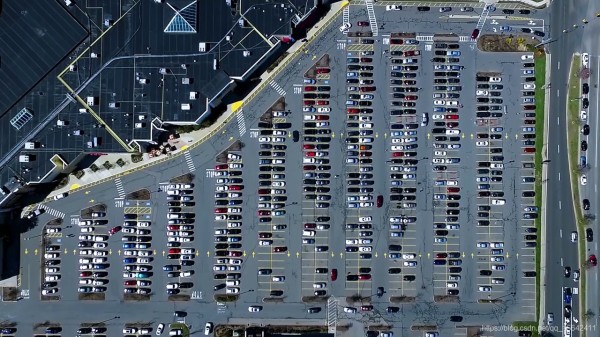
给定若干副图像,如何得到样本点?----传统图像的经验
如下一副图像

1)颜色提取,得到白色黄色的RGB图像
效果如下:
2)灰度化(技巧利用map函数,map(func,iter))
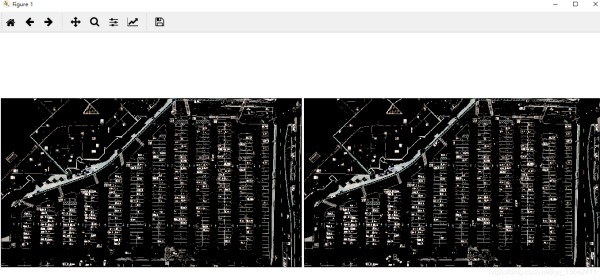
3)利用canny边缘检测
4)提取感兴趣区域
效果图如下:
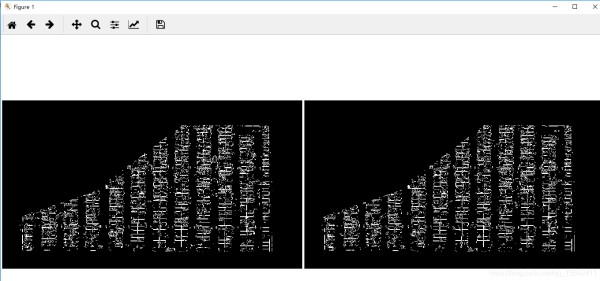
5)霍夫直线检测(给予边缘检测后的图像)
6)得到每个车位的块(一列)
(1)对霍夫直线过滤
(2)对起点坐标(根据起点x1)排序
(3)聚类找到距离起点(x1)最近的点
(4)得到每个parking rect的坐标,建立缓冲得到每个车位块
效果图如下

7)得到每个车位
如下图:
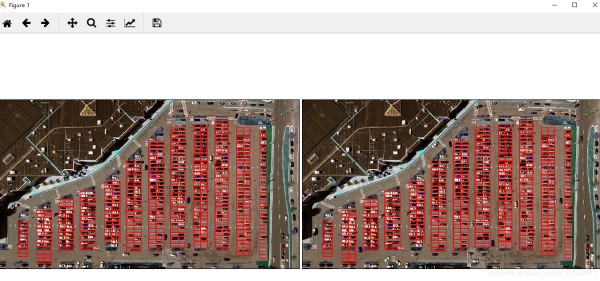
8)裁剪图得到训练样本
二、利用CNN训练模型(keras就可以)第一部分代码如下
#coding= utf-8 from __future__ import division import matplotlib.pyplot as plt import cv2 import os, glob import numpy as np cwd = os.getcwd() def show_images(images, cmap=None): cols = 2 rows = (len(images)+1)//cols plt.figure(figsize=(15, 12)) for i, image in enumerate(images): plt.subplot(rows, cols, i+1) # 只有一个通道的时候用gray cmap = 'gray' if len(image.shape)==2 else cmap plt.imshow(image, cmap=cmap) plt.xticks([]) plt.yticks([]) plt.tight_layout(pad=0, h_pad=0, w_pad=0) plt.show() test_images = [cv2.imread(os.path.abspath(cwd+"\\"+path)) for path in glob.glob('test_images/*.jpg')] # show_images(test_images) def select_rgb_white_yellow(image): # 白色提取,mask lower = np.uint8([120, 120, 120]) upper = np.uint8([255, 255, 255]) white_mask = cv2.inRange(image, lower, upper) # 黄色提取mask lower = np.uint8([190, 190, 0]) upper = np.uint8([255, 255, 255]) yellow_mask = cv2.inRange(image, lower, upper) # 联合mask mask = cv2.bitwise_or(white_mask, yellow_mask) masked = cv2.bitwise_and(image, image, mask = mask) return masked white_yellow_images = list(map(select_rgb_white_yellow, test_images)) show_images(white_yellow_images) #图像转换 def convert_gray_scale(image): return cv2.cvtColor(image, cv2.COLOR_RGB2GRAY) gray_images = list(map(convert_gray_scale, white_yellow_images)) show_images(gray_images) #使用canny 检测边缘 def detect_edges(image, low_threshold=50, high_threshold=200): return cv2.Canny(image, low_threshold, high_threshold) edge_images = list(map(lambda image: detect_edges(image), gray_images)) show_images(edge_images) #识别感兴趣区域 def filter_region(image, vertices): """ 利用输入图像的顶点创建一个mask """ mask = np.zeros_like(image) if len(mask.shape)==2: cv2.fillPoly(mask, vertices, 255)#单通道,255是颜色 else: cv2.fillPoly(mask, vertices, (255,)*mask.shape[2]) # 以免图像是多通道。 return cv2.bitwise_and(image, mask) def select_region(image): """ """ # 定义顶点 rows, cols = image.shape[:2] pt_1 = [cols*0.05, rows*0.90] pt_2 = [cols*0.05, rows*0.70] pt_3 = [cols*0.30, rows*0.55] pt_4 = [cols*0.6, rows*0.15] pt_5 = [cols*0.90, rows*0.15] pt_6 = [cols*0.90, rows*0.90] # 顶点坐标虚整形,因为像素。 vertices = np.array([[pt_1, pt_2, pt_3, pt_4, pt_5, pt_6]], dtype=np.int32) return filter_region(image, vertices) roi_images = list(map(select_region, edge_images)) show_images(roi_images) ''' ''' def hough_lines(image): """ 图像应该是边缘检测后的 """ return cv2.HoughLinesP(image, rho=0.1, theta=np.pi/10, threshold=15, minLineLength=9, maxLineGap=4) list_of_lines = list(map(hough_lines, roi_images)) #画线 def draw_lines(image, lines, color=[255, 0, 0], thickness=2, make_copy=True): # cv2.HoughLinesP 变换检测出来的线形状如下: (-1, 1, 4) if make_copy: image = np.copy(image) # don't want to modify the original cleaned = [] for line in lines: for x1,y1,x2,y2 in line: if abs(y2-y1) <=1 and abs(x2-x1) >=25 and abs(x2-x1) <= 55:#delta y<1说明是水平线,线的长度大于25,小于55 cleaned.append((x1,y1,x2,y2)) cv2.line(image, (x1, y1), (x2, y2), color, thickness) print(" 检测到的线的数目: ", len(cleaned)) return image line_images = [] for image, lines in zip(test_images, list_of_lines):#这里用的是原图,testimages,list_of_line是利用roiimage检测出来的 line_images.append(draw_lines(image, lines)) show_images(line_images) ############ ############ def identify_blocks(image, lines, make_copy=True): if make_copy: new_image = np.copy(image) #Step 1: 收集纯线,即是满足要求的线 cleaned = [] for line in lines: for x1,y1,x2,y2 in line: #水平线,长度鉴于25,55之间 if abs(y2-y1) <=1 and abs(x2-x1) >=25 and abs(x2-x1) <= 55: cleaned.append((x1,y1,x2,y2)) #Step 2: 对起点坐标排序,x1 ''' operator.itemgetter是获取哪一维数据 ''' import operator list1 = sorted(cleaned, key=operator.itemgetter(0, 1)) #Step 3: 找到距离x1最近的点 clusters = {} dIndex = 0 clus_dist = 10 for i in range(len(list1) - 1): distance = abs(list1[i+1][0] - list1[i][0]) # print(distance) if distance <= clus_dist: if not dIndex in clusters.keys(): clusters[dIndex] = [] clusters[dIndex].append(list1[i]) clusters[dIndex].append(list1[i + 1]) else: dIndex += 1 #Step 4: rects = {} i = 0 for key in clusters: all_list = clusters[key] cleaned = list(set(all_list)) if len(cleaned) > 5: cleaned = sorted(cleaned, key=lambda tup: tup[1]) avg_y1 = cleaned[0][1] avg_y2 = cleaned[-1][1] # print(avg_y1, avg_y2) avg_x1 = 0 avg_x2 = 0 for tup in cleaned: avg_x1 += tup[0] avg_x2 += tup[2] avg_x1 = avg_x1/len(cleaned) avg_x2 = avg_x2/len(cleaned) rects[i] = (avg_x1, avg_y1, avg_x2, avg_y2) i += 1 # print(clusters) print("parking 数目: ", len(rects)) #Step 5: 画图 buff = 7#建立缓冲区 for key in rects: tup_topLeft = (int(rects[key][0] - buff), int(rects[key][1])) tup_botRight = (int(rects[key][2] + buff), int(rects[key][3])) # cv2.rectangle(new_image,(int(rects[key][0]),int(rects[key][1])),(int(rects[key][2]),int(rects[key][3])),(0,0,255),3) cv2.rectangle(new_image, tup_topLeft,tup_botRight,(0,255,0),3) return new_image, rects #### rect_images = [] rect_coords = [] for image, lines in zip(test_images, list_of_lines): new_image, rects = identify_blocks(image, lines) rect_images.append(new_image) rect_coords.append(rects) show_images(rect_images) ######### ''' 识别每个停车场区域的每个车位 ''' ######### def draw_parking(image, rects, make_copy = True, color=[255, 0, 0], thickness=2, save = True): if make_copy: new_image = np.copy(image) gap = 15.5 spot_dict = {} # 储存每个车位的id tot_spots = 0 adj_y1 = {0: 20, 1:-10, 2:0, 3:-11, 4:28, 5:5, 6:-15, 7:-15, 8:-10, 9:-30, 10:9, 11:-32} adj_y2 = {0: 30, 1: 50, 2:15, 3:10, 4:-15, 5:15, 6:15, 7:-20, 8:15, 9:15, 10:0, 11:30} adj_x1 = {0: -8, 1:-15, 2:-15, 3:-15, 4:-15, 5:-15, 6:-15, 7:-15, 8:-10, 9:-10, 10:-10, 11:0} adj_x2 = {0: 0, 1: 15, 2:15, 3:15, 4:15, 5:15, 6:15, 7:15, 8:10, 9:10, 10:10, 11:0} for key in rects: # 水平线 if key<12: tup = rects[key] x1 = int(tup[0]+ adj_x1[key]) x2 = int(tup[2]+ adj_x2[key]) y1 = int(tup[1] + adj_y1[key]) y2 = int(tup[3] + adj_y2[key]) cv2.rectangle(new_image, (x1, y1),(x2,y2),(0,255,0),2) num_splits = int(abs(y2-y1)//gap) for i in range(0, num_splits+1): y = int(y1 + i*gap) cv2.line(new_image, (x1, y), (x2, y), color, thickness) if key > 0 and key < len(rects) -1 : #画上竖直线 x = int((x1 + x2)/2) cv2.line(new_image, (x, y1), (x, y2), color, thickness) # if key == 0 or key == (len(rects) -1): tot_spots += num_splits +1 else: tot_spots += 2*(num_splits +1) # if key == 0 or key == (len(rects) -1): for i in range(0, num_splits+1): cur_len = len(spot_dict) y = int(y1 + i*gap) spot_dict[(x1, y, x2, y+gap)] = cur_len +1 else: for i in range(0, num_splits+1): cur_len = len(spot_dict) y = int(y1 + i*gap) x = int((x1 + x2)/2) spot_dict[(x1, y, x, y+gap)] = cur_len +1 spot_dict[(x, y, x2, y+gap)] = cur_len +2 print("总的停车位: ", tot_spots, cur_len) if save: filename = 'with_parking.jpg' cv2.imwrite(filename, new_image) return new_image, spot_dict # delineated = [] spot_pos = [] for image, rects in zip(test_images, rect_coords): new_image, spot_dict = draw_parking(image, rects) delineated.append(new_image) spot_pos.append(spot_dict) # print(spot_pos) show_images(delineated) # final_spot_dict = spot_pos[1] def assign_spots_map(image, spot_dict=final_spot_dict, make_copy = True, color=[255, 0, 0], thickness=2): if make_copy: new_image = np.copy(image) for spot in spot_dict.keys(): (x1, y1, x2, y2) = spot cv2.rectangle(new_image, (int(x1),int(y1)), (int(x2),int(y2)), color, thickness) return new_image marked_spot_images = list(map(assign_spots_map, test_images)) show_images(marked_spot_images) # import pickle with open('spot_dict.pickle', 'wb') as handle: pickle.dump(final_spot_dict, handle, protocol=pickle.HIGHEST_PROTOCOL) ## 得到训练样本 def save_images_for_cnn(image, spot_dict = final_spot_dict, folder_name ='for_cnn'): for spot in spot_dict.keys(): (x1, y1, x2, y2) = spot (x1, y1, x2, y2) = (int(x1), int(y1), int(x2), int(y2)) #crop this image # print(image.shape) spot_img = image[y1:y2, x1:x2] spot_img = cv2.resize(spot_img, (0,0), fx=2.0, fy=2.0) spot_id = spot_dict[spot] filename = 'spot' + str(spot_id) +'.jpg' print(spot_img.shape, filename, (x1,x2,y1,y2)) # print(os.path.join(cwd+"\\"+folder_name, filename)) cv2.imwrite(os.path.join(cwd+"\\"+folder_name, filename), spot_img) save_images_for_cnn(test_images[0])
123456789101112131415161718192021222324252627282930313233343536373839404142434445464748495051525354555657585960616263646566676869707172737475767778798081828384858687888990919293949596979899100101102103104105106107108109110111112113114115116117118119120121122123124125126127128129130131132133134135136137138139140141142143144145146147148149150151152153154155156157158159160161162163164165166167168169170171172173174175176177178179180181182183184185186187188189190191192193194195196197198199200201202203204205206207208209210211212213214215216217218219220221222223224225226227228229230231232233234235236237238239240241242243244245246247248249250251252253254255256257258259260261262263264265266267268269270271272273274275276277278279280网址:智能停车检测与CNN训练 https://www.yuejiaxmz.com/news/view/707361
相关内容
使用深度学习优化停车难题:通用停车位检测项目详解智能生活垃圾检测与分类系统(UI界面+YOLOv5+训练数据集)
CNN训练与优化技巧
目标检测算法: 对Faster RCNN论文的理解与实践
卷积神经网络的优化技巧:加速训练与提高性能
深度学习在艺术品瑕疵检测与修复中的新光芒:文化遗产保护的创新前景标题:基于卷积神经网络的艺术品瑕疵检测与修复:人工智能在
智能停车位传感器:技术挑战与性能优化之道
回归预测
CNN优化全攻略:卷积神经网络性能提升的20条技巧
基于深度学习的智能停车场车牌识别计费系统(完整程序+训练数据集+开题报告+论文))
随便看看
最新动态分享
- 未来生活:科技发展对生活方式的影响
- 科技进步及生活方式的变化 居民消费方式日益多样化
- 如何选择适合的免费外国主机
- 聊聊未来已来:数字化服务如何改变工作方式
- 卓越科技引领自动化仪表行业新方向
- 携手推动零售行业智能化变革
- 智能科技的快速发展正在改变着人们的生活方式
- 家居日常地板清洁保养有技巧更精彩
- 地板上的污渍擦不掉怎么办
- 怎样清洗木地板最干净(怎样清洗木地板最干净又除菌)
热点动态分享
- 138515
- 40863
- 36488
- 25567
- 24760
- 23853
- 21582
- 16453
- 15069
- 15040