【React】React 生命周期完全指南
React前端开发:FreeCodeCamp的React课程很受欢迎 #生活技巧# #工作学习技巧# #编程学习资源#


React 生命周期完全指南

一、生命周期概述
React 组件的生命周期是指组件从创建、更新到销毁的整个过程。合理地使用生命周期方法可以让我们更好地控制组件的行为,优化性能,并处理副作用。
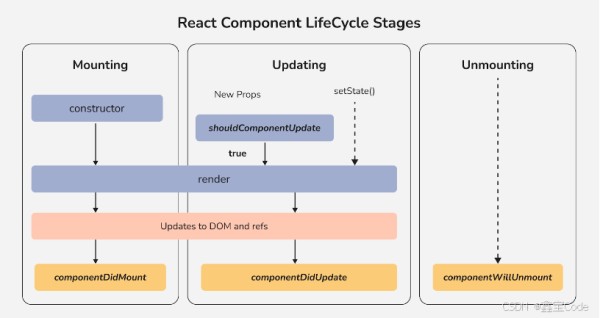
二、生命周期的三个阶段
2.1 挂载阶段(Mounting)组件实例被创建并插入 DOM 的过程
class MyComponent extends React.Component { // 1. 构造函数 constructor(props) { super(props); this.state = { count: 0 }; console.log('1. constructor'); } // 2. 静态方法,很少使用 static getDerivedStateFromProps(props, state) { console.log('2. getDerivedStateFromProps'); return null; } // 3. 渲染方法 render() { console.log('3. render'); return <div>{this.state.count}</div>; } // 4. 挂载完成 componentDidMount() { console.log('4. componentDidMount'); } }
12345678910111213141516171819202122232425 2.2 更新阶段(Updating)当组件的 props 或 state 发生变化时触发更新
class MyComponent extends React.Component { // 1. 静态方法 static getDerivedStateFromProps(props, state) { return null; } // 2. 是否应该更新 shouldComponentUpdate(nextProps, nextState) { return true; } // 3. 渲染 render() { return <div>{this.state.count}</div>; } // 4. 获取更新前的快照 getSnapshotBeforeUpdate(prevProps, prevState) { return null; } // 5. 更新完成 componentDidUpdate(prevProps, prevState, snapshot) { // 处理更新后的操作 } }
1234567891011121314151617181920212223242526 2.3 卸载阶段(Unmounting)组件从 DOM 中移除的过程
class MyComponent extends React.Component { componentWillUnmount() { // 清理工作,比如清除定时器、取消订阅等 console.log('组件即将卸载'); } } 123456
三、常用生命周期方法详解
constructor(props) { super(props); // 初始化状态 this.state = { count: 0, data: [] }; // 绑定方法 this.handleClick = this.handleClick.bind(this); } 12345678910
使用场景:
初始化组件的 state绑定事件处理方法不要在这里调用 setState避免在这里执行副作用操作 3.2 componentDidMountcomponentDidMount() { // 发起网络请求 fetch('api/data') .then(res => res.json()) .then(data => { this.setState({ data }); }); // 添加事件监听 window.addEventListener('resize', this.handleResize); // 设置定时器 this.timer = setInterval(() => { this.setState(state => ({ count: state.count + 1 })); }, 1000); }
123456789101112131415161718使用场景:
发起网络请求DOM 操作添加订阅设置定时器 3.3 componentDidUpdatecomponentDidUpdate(prevProps, prevState, snapshot) { // 比较 props 变化 if (this.props.userID !== prevProps.userID) { this.fetchData(this.props.userID); } // 比较 state 变化 if (this.state.count !== prevState.count) { document.title = `点击次数:${this.state.count}`; } } 1234567891011
使用场景:
对比更新前后的数据根据条件执行副作用注意避免无限循环 3.4 componentWillUnmountcomponentWillUnmount() { // 清除定时器 clearInterval(this.timer); // 移除事件监听 window.removeEventListener('resize', this.handleResize); // 取消订阅 this.subscription.unsubscribe(); } 12345678910
使用场景:
清理定时器取消网络请求清除事件监听取消订阅四、生命周期的最佳实践
4.1 性能优化class OptimizedComponent extends React.Component { shouldComponentUpdate(nextProps, nextState) { // 只在必要时更新 return ( this.props.value !== nextProps.value || this.state.count !== nextState.count ); } render() { return ( <div> <h1>{this.props.value}</h1> <p>{this.state.count}</p> </div> ); } }
123456789101112131415161718 4.2 错误处理class ErrorBoundary extends React.Component { state = { hasError: false }; static getDerivedStateFromError(error) { return { hasError: true }; } componentDidCatch(error, errorInfo) { // 记录错误日志 console.error('错误信息:', error); console.error('错误详情:', errorInfo); } render() { if (this.state.hasError) { return <h1>出错了!</h1>; } return this.props.children; } }
1234567891011121314151617181920五、新旧生命周期的变化
5.1 已废弃的生命周期方法 componentWillMountcomponentWillReceivePropscomponentWillUpdate 5.2 新增的生命周期方法 getDerivedStateFromPropsgetSnapshotBeforeUpdate六、Hooks 时代的生命周期
function HooksComponent() { // 相当于 constructor 和 componentDidMount const [count, setCount] = useState(0); // 相当于 componentDidMount 和 componentDidUpdate useEffect(() => { document.title = `点击次数:${count}`; }, [count]); // 相当于 componentDidMount 和 componentWillUnmount useEffect(() => { const handler = () => console.log('窗口大小改变'); window.addEventListener('resize', handler); // 清理函数 return () => { window.removeEventListener('resize', handler); }; }, []); return <div>计数:{count}</div>; }
12345678910111213141516171819202122七、总结
React 生命周期方法为我们提供了在组件不同阶段执行代码的机会。合理使用这些方法可以:
优化组件性能正确处理副作用管理组件状态避免内存泄漏在实际开发中,最常用的生命周期方法是:
constructor:初始化componentDidMount:副作用处理componentDidUpdate:更新后的操作componentWillUnmount:清理工作随着 React Hooks 的普及,函数组件正在逐渐取代类组件。但理解生命周期概念对于深入理解 React 的工作原理仍然至关重要。


网址:【React】React 生命周期完全指南 https://www.yuejiaxmz.com/news/view/483459
相关内容
【react全家桶学习】react的 (新/旧) 生命周期(重点)React 生命周期(新、旧)及 案例
React系列之新旧生命周期对比
React新旧生命周期区别对比React生命周期是非常重要的内容,根据官网的区分,以16.4版本为分界线有新旧生命周期,
React Navigation 中文网
从React到WR跑步:揭秘高效代码与健身生活的完美融合
构建React TodoList应用:管理你的任务清单
React核心技术解析:以“智能购物助手”洞悉奥秘
【开发必备神器】一键清理React Native缓存 —— Clean
React任务跟踪器:优化日常生活管理
随便看看
最新动态分享
- 先出发再计划,“听劝式旅行”爆改自由行
- 二十多万移动小家,舒适安全两不误,纵享自由旅行生活
- 北语召开学生宿舍生活配套设施建设项目“六方环境联合验收交底”会
- 马天宇是如何平衡紧张的演艺工作与个人旅行生活的?
- 如何选择:独自旅行的自由 vs 结伴旅游的乐趣与意义
- ✨卧室收纳终极指南|床与衣柜距离多少最合理?附5种黄金布局方案✨
- 女生卧室衣柜内衣内裤收纳指南|5大设计+10种收纳法,小户型也能扩容50%
- 室内装修7天速效除甲醛指南|科学方法+避坑干货!新手必看零甲醛攻略
- 梳妆台和衣柜摆放技巧小户型卧室收纳指南
- 装修必看!3大甲醛治理误区+5招速效除醛法(附品牌清单)
热点动态分享
- 136598
- 39849
- 36331
- 23802
- 23736
- 23442
- 21443
- 15546
- 14980
- 14951