本文由 GXIC 作者 wongxmig 完成,欢迎关注 IoT 开发者社区。
1. 准备工作
1.1 注册阿里云账号使用个人淘宝账号或手机号,开通阿里云账号,并通过__实名认证(可以用支付宝认证)__
1.2 免费开通IoT物联网套件产品官网 https://www.aliyun.com/product/iot

JDK安装
编辑器 IDEA
2. 开发步骤
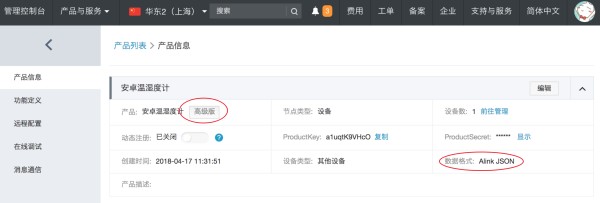
2.1 云端开发 1) 创建高级版产品
添加产品属性定义
属性名标识符数据类型范围温度temperaturefloat-50~100湿度humidityfloat0~100
物模型对应属性上报topic
/sys/替换为productKey/替换为deviceName/thing/event/property/post
物模型对应的属性上报payload
{
id: 123452452,
params: {
temperature: 26.2,
humidity: 60.4
},
method: "thing.event.property.post"
}
3) 设备管理>注册设备,获得身份三元组
我们以java程序来模拟设备,建立连接,上报数据。
1) pom.xml添加sdk依赖<dependencies>
<dependency>
<groupId>org.eclipse.paho</groupId>
<artifactId>org.eclipse.paho.client.mqttv3</artifactId>
<version>1.1.0</version>
</dependency>
<dependency>
<groupId>com.google.guava</groupId>
<artifactId>guava</artifactId>
<version>23.0</version>
</dependency>
</dependencies>
2) AliyunIoTSignUtil工具类import javax.crypto.Mac;
import javax.crypto.SecretKey;
import javax.crypto.spec.SecretKeySpec;
import java.util.Arrays;
import java.util.Map;
public class AliyunIoTSignUtil {
public static String sign(Map<String, String> params, String deviceSecret, String signMethod) {
String[] sortedKeys = params.keySet().toArray(new String[] {});
Arrays.sort(sortedKeys);
StringBuilder canonicalizedQueryString = new StringBuilder();
for (String key : sortedKeys) {
if ("sign".equalsIgnoreCase(key)) {
continue;
}
canonicalizedQueryString.append(key).append(params.get(key));
}
try {
String key = deviceSecret;
return encryptHMAC(signMethod,canonicalizedQueryString.toString(), key);
} catch (Exception e) {
throw new RuntimeException(e);
}
}
public static String encryptHMAC(String signMethod,String content, String key) throws Exception {
SecretKey secretKey = new SecretKeySpec(key.getBytes("utf-8"), signMethod);
Mac mac = Mac.getInstance(secretKey.getAlgorithm());
mac.init(secretKey);
byte[] data = mac.doFinal(content.getBytes("utf-8"));
return bytesToHexString(data);
}
public static final String bytesToHexString(byte[] bArray) {
StringBuffer sb = new StringBuffer(bArray.length);
String sTemp;
for (int i = 0; i < bArray.length; i++) {
sTemp = Integer.toHexString(0xFF & bArray[i]);
if (sTemp.length() < 2) {
sb.append(0);
}
sb.append(sTemp.toUpperCase());
}
return sb.toString();
}
}
3) 模拟设备IoTDemo.java代码public class IoTDemo {
public static String productKey = "替换productKey";
public static String deviceName = "替换deviceName";
public static String deviceSecret = "替换deviceSecret";
public static String regionId = "cn-shanghai";
private static String pubTopic = "/sys/" + productKey + "/" + deviceName + "/thing/event/property/post";
private static final String payloadJson =
"{" +
" \"id\": %s," +
" \"params\": {" +
" \"temperature\": %s," +
" \"humidity\": %s" +
" }," +
" \"method\": \"thing.event.property.post\"" +
"}";
private static MqttClient mqttClient;
private static Random random = new Random();
private static DecimalFormat df = new DecimalFormat("0.#");
public static void main(String [] args) {
initAliyunIoTClient();
ScheduledExecutorService scheduledThreadPool = new ScheduledThreadPoolExecutor(1,
new ThreadFactoryBuilder().setNameFormat("thread-runner-%d").build());
scheduledThreadPool.scheduleAtFixedRate(()->postDeviceProperties(), 10,10, TimeUnit.SECONDS);
}
private static void initAliyunIoTClient() {
try {
String clientId = "java" + System.currentTimeMillis();
Map<String, String> params = new HashMap<>(16);
params.put("productKey", productKey);
params.put("deviceName", deviceName);
params.put("clientId", clientId);
String timestamp = String.valueOf(System.currentTimeMillis());
params.put("timestamp", timestamp);
String targetServer = "tcp://" + productKey + ".iot-as-mqtt."+regionId+".aliyuncs.com:1883";
String mqttclientId = clientId + "|securemode=3,signmethod=hmacsha1,timestamp=" + timestamp + "|";
String mqttUsername = deviceName + "&" + productKey;
String mqttPassword = AliyunIoTSignUtil.sign(params, deviceSecret, "hmacsha1");
connectMqtt(targetServer, mqttclientId, mqttUsername, mqttPassword);
} catch (Exception e) {
System.out.println("initAliyunIoTClient error " + e.getMessage());
}
}
public static void connectMqtt(String url, String clientId, String mqttUsername, String mqttPassword) throws Exception {
MemoryPersistence persistence = new MemoryPersistence();
mqttClient = new MqttClient(url, clientId, persistence);
MqttConnectOptions connOpts = new MqttConnectOptions();
connOpts.setMqttVersion(4);
connOpts.setAutomaticReconnect(false);
connOpts.setCleanSession(true);
connOpts.setUserName(mqttUsername);
connOpts.setPassword(mqttPassword.toCharArray());
connOpts.setKeepAliveInterval(60);
mqttClient.connect(connOpts);
}
private static void postDeviceProperties() {
try {
String payload = String.format(payloadJson, System.currentTimeMillis(), df.format(25+random.nextFloat()*10), df.format(50+random.nextFloat()*30));
System.out.println("post :"+payload);
MqttMessage message = new MqttMessage(payload.getBytes("utf-8"));
message.setQos(1);
mqttClient.publish(pubTopic, message);
} catch (Exception e) {
}
}
}
3. 启动运行
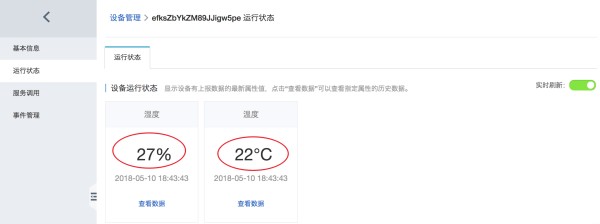
3.1 设备启动Run IoTDemo.main 3.2 云端查看设备运行状态

4. 项目源码
download: therometer.zip
download: aliyun-iot-demo-java.zip
<a class="anchor" id="" href="#80ifpi"></a>


