开发基于SpringBoot和BootStrap的全栈论坛网站(七):完成回复和二级回复功能
关注二手书交易网站和论坛,获取信息 #生活技巧# #节省生活成本# #生活节俭# #二手书籍借阅#
论坛的搭建即将进入尾声,完成回复功能后只剩最后一个大功能:通知。然后就是对页面的精修和一些bug的修复,这些不会通过博客来展示,历史博客记录可以看我的实战项目专辑,在这里也不放链接了。
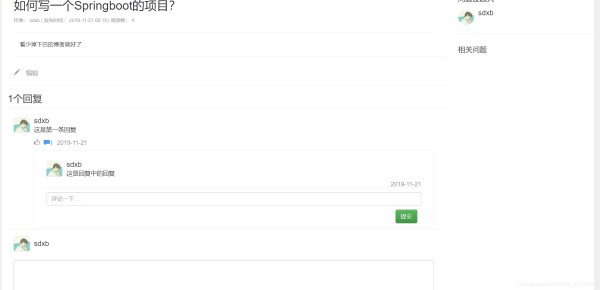
对一个论坛网站来说,回复功能也是很重要的功能,在完成之前所有功能后,今天的任务就是完成问题的回复功能,主要的效果图如下:
(一)搭建Comment数据库
一个回复需要包含主键id;所回复问题或者回复评论的parent_id;一个判断是回复问题还是回复别人评论的type,当type=1时,回复问题,当type=2时,回复别人的评论;回复人commentor;回复时间createtime;点赞数like_count;回复内容content;回复数:commentcount
CREATE TABLE `comment` (
`id` int(11) NOT NULL AUTO_INCREMENT,
`parent_id` int(11) NOT NULL,
`type` int(11) NOT NULL,
`commentor` int(11) DEFAULT NULL,
`createtime` bigint(20) DEFAULT NULL,
`like_count` int(11) DEFAULT '0',
`content` varchar(200) NOT NULL,
`commentcount` int(11) DEFAULT '0',
PRIMARY KEY (`id`)
)
建完数据库之后创建实体类:
public class Comment {
private int id;
private int parent_id;
private int type;
private int commentor;
private int like_count;
private long createtime;
private int commentcount;
private String content;
}
(二)Comment的数据传输结构
当用户输入回复,点击提交之后,我希望从前端传过来的数据包含parent_id(所回复对象的id),content(回复的内容)和type(判断回复的是问题还是评论),因为user的信息和创建时间等都可以直接在后端获取,不需要从前端传过来。于是建立commentcreateDTO,用来封装传递过来的数据:
public class CommentCreateDto {
private int parent_id;
private int type;
private String content;
}
前端需要展示回复的信息,因此需要从后端传递回复数据给前端,传给前端的数据不仅要包含comment的所有属性,还要包含user的所有信息,因为我们需要展示出是回复人的姓名和头像,于是创建CommentDTO用于封装传给前端的数据:
public class CommentDto {
private int id;
private int parent_id;
private int type;
private int commentor;
private int like_count;
private long createtime;
private int commentcount;
private String content;
private User user;
}
同时,如果comment成功插入到数据库了,我希望前端能知道成功了,因此再创建一个ResultDto,里面包含是否成功的信息以及CommentDTO的数据:
public class ResultDto<T> {
private int code;
private String message;
private T data;
public ResultDto success(){
ResultDto resultDto=new ResultDto();
resultDto.setCode(200);
resultDto.setMessage("成功");
return resultDto;
}
public <T> ResultDto success(T data){
ResultDto resultDto=new ResultDto();
resultDto.setCode(200);
resultDto.setMessage("成功");
resultDto.setData(data);
return resultDto;
}
//省略getter and setter 方法
}
(三)完成回复问题功能
问题回复功能有两个模块,一是展示回复内容,二是回复框的处理。展示回复内容很简单,在questionController中增加两行代码:
List<CommentDto> comments=commentService.getByid(id);
model.addAttribute("comments",comments);
通过问题的id查找到回复信息,放进一个List中,并通过model传递给前端,前端只需要通过each的方式逐条获取数据展示就行。前端的代码请看源码的question.html
前端回复框包含一个textarea和一个button,给button设置onclick属性,通过jquery来处理点击提交后的回复的逻辑,写一个隐藏起来的input,这个input不会展示在前端页面上,但是可以用来传递问题的id,让后台知道是在哪个问题下评论
<input type="hidden" id="question_id" th:value="${questionDto.id}">
<textarea class="form-control" rows="6" style="margin-top:10px; margin-bottom: 10px;"
id="content"></textarea>
<button type="button" class="btn btn-success" style="float: right;margin: 10px;"
onclick="post()">提交
新建community.js,把数据封装成一个json格式给到后端
function post() {
//获取问题id
var questionid = $("#question_id").val();
//获取回复内容
var content = $("#content").val();
if(content==''){
alert("回复内容不能为空")
}else {
$.ajax({
type:"POST",
url:"/comment",
contentType:'application/json',
data: JSON.stringify({
"parent_id":questionid,
"type":1,
"content":content
}),
//获取后端返回过来的数据,也就是ResultDTO
success: function (data) {
if (data.code==200){
window.location.reload();
} else{
alert("出现了错误");
}
},
dataType:"json"
});
}
}
新建CommentController,将数据写进数据库,具体操作和之前基本一致
@Controller
public class CommentController {
@Resource
private UserMapper userMapper;
@Resource
private CommentMapper commentMapper;
@Resource
private QuestionMapper questionMapper;
@ResponseBody
@RequestMapping(value = "/comment",method = RequestMethod.POST)
public Object post(@RequestBody CommentCreateDto commentCreateDto,
HttpServletRequest request){
Cookie[] cookies = request.getCookies();
if (cookies == null) {
return "login";
}
User user = null;
for (Cookie cookie : cookies) {
if (cookie.getName().equals("token")) {
String token = cookie.getValue();
user = userMapper.findBytoken(token);
if (user != null) {
request.getSession().setAttribute("user", user);
}
break;
}
}
Comment comment=new Comment();
comment.setParent_id(commentCreateDto.getParent_id());
comment.setContent(commentCreateDto.getContent());
comment.setType(commentCreateDto.getType());
comment.setCreatetime(System.currentTimeMillis());
comment.setCommentor(user.getId());
commentMapper.insert(comment);
if (commentCreateDto.getType()==2){
commentMapper.updatecommentcount(commentCreateDto.getParent_id());
}else {
questionMapper.updatecomment(commentCreateDto.getParent_id());
}
ResultDto resultDto=new ResultDto();
return resultDto.success();
}
}
这样一个回复功能就完成了。
(四)完成二级回复问题功能
二级回复功能的处理比一级回复要更麻烦一些,二级回复也分成回复展示和回复框两块,只是二级回复的回复展示我打算用js传递给前端,所以先写二级评论的输入框功能,同样包含一个input和button,在button上有onclick属性
<div class="col-lg-12 col-md-12 col-sm-12 col-ss-12" style="margin-top: 10px;">
<input type="text" class="form-control" placeholder="评论一下....." th:id="${'input-'+comment.id}">
<button type="button" class="btn btn-success" style="float: right;margin: 10px;"
onclick="replypost(this)" th:data-id="${comment.id}">
提交
</button>
</div>
在community.js中新增方法,也一样是将回复内容上传给后端,只是这里将type改成了2,因为回复的是别人的评论,parentid也变成了评论的id
function replypost(e) {
var commentid = e.getAttribute("data-id");
var content = $("#input-"+commentid).val();
if(content==''){
alert("回复内容不能为空")
}else {
$.ajax({
type:"POST",
url:"/comment",
contentType:'application/json',
data: JSON.stringify({
"parent_id":commentid,
"type":2,
"content":content
}),
success: function (data) {
if (data.code==200){
window.location.reload();
} else{
alert("出现了错误");
}
},
dataType:"json"
});
}
}
在一级评论的回复按钮上增加onclick,用于点击后展开回复内容
<!--回复按钮-->
<span class="glyphicon glyphicon-comment icon" aria-hidden="true"
th:data-id="${comment.id}" th:data-check="1" onclick="secondcomment(this)" th:text="${comment.commentcount}"></span>
在CommentController新增一个方法,把回复数据传递给前端
@ResponseBody
@RequestMapping(value = "/comment/{id}",method = RequestMethod.GET)
public ResultDto<List<CommentDto>> comments(@PathVariable(name = "id") int id,
HttpServletRequest request){
List<Comment> comments = commentMapper.getCommentByid(id,2);
List<CommentDto> commentDto=new ArrayList<>();
Cookie[] cookies = request.getCookies();
User user = null;
for (Cookie cookie : cookies) {
if (cookie.getName().equals("token")) {
String token = cookie.getValue();
user = userMapper.findBytoken(token);
break;
}
}
for (Comment comment:comments){
CommentDto dto=new CommentDto();
BeanUtils.copyProperties(comment,dto);
dto.setUser(user);
commentDto.add(dto);
}
ResultDto resultDto=new ResultDto();
return resultDto.success(commentDto);
}
前端js中的secondcomment方法通过$.getJSON获取到后端发过来的数据,然后通过 $.each循环List中的每一条数据,回复展示的内容我使用jquery将html代码插入到html页面中id为comment-id的div块中,js中所插入的html代码相当于这一段:
<div class="col-lg-12 col-md-12 col-sm-12 col-ss-12" th:each="comment:${comments}">
<div class="media">
<div class="media-left">
<img class="media-object img-rounded picset"
src="https://profile.csdnimg.cn/F/C/F/1_qq_41973594?v=1574041386">
</div>
<div class="media-body">
<h4 class="media-heading">
<span th:text="${comment.user.name}"/>
<div style="font-size: 15px; margin-top:5px;"
th:text="${comment.content}">
</div>
<div class="question-menu">
<span th:text="${#dates.format(comment.createtime,'yyyy-MM-dd')}"
style="float: right"></span>
</div>
</h4>
</div>
</div>
</div>
js代码
function secondcomment(e) {
var id = e.getAttribute("data-id");
var check = e.getAttribute("data-check");
var comment = $("#comment-"+id);
if (check=="1"){
$.getJSON("/comment/"+id , function (data) {
var subCommentContainer=$("#comment-"+id) ;
if (subCommentContainer.children().length ==1){
$.each(data.data.reverse(),function (index,comment) {
var usernameElement=$("<span/>",{
html:comment.user.name
});
var contentElement=$("<div/>",{
"style":"font-size: 15px; margin-top:5px;",
html:comment.content
});
var timeElement=$("<span/>",{
"style":"float: right",
html:moment(comment.createtime).format('YYYY-MM-DD')
});
var questionmenuElement=$("<div/>",{
"class":"question-menu"
}).append(timeElement);
var imgElement = $("<img/>",{
"class":"media-object img-rounded picset",
"src":"https://profile.csdnimg.cn/F/C/F/1_qq_41973594?v=1574041386"
});
var medialeftElement=$("<div/>",{
"class":"media-left"
}).append(imgElement);
var mediaheadingElement=$("<h4/>",{
"class":"media-heading",
}).append(usernameElement)
.append(contentElement)
.append(questionmenuElement);
var mediabodyElement=$("<div/>",{
"class":"media-body",
}).append(mediaheadingElement);
var mediaElement=$("<div/>",{
"class":"media"
}).append(medialeftElement)
.append(mediabodyElement);
var commentElement=$("<div/>",{
"class":"col-lg-12 col-md-12 col-sm-12 col-ss-12 comments",
}).append(mediaElement);
subCommentContainer.prepend(commentElement);
})
}
});
comment.addClass("in");
e.setAttribute("data-check","0");
e.classList.add("active");
}else {
comment.removeClass("in");
e.setAttribute("data-check","1")
e.classList.remove("active");
}
}
这样回复和二级回复功能就完成了,完成这些后,一个论坛所需要的基本功能就全部完成了,接下来就是对论坛界面和其他一些小功能的小修小补,首页的热门问题还未写,搜索功能目前也没有,用户的头像目前用的是统一的图片,个人中心中我的消息功能还未做,还想优化一下标签功能。
附上源码:github源码
网址:开发基于SpringBoot和BootStrap的全栈论坛网站(七):完成回复和二级回复功能 https://www.yuejiaxmz.com/news/view/885109
相关内容
【原创】springboot+mysql宠物领养和论坛系统设计与实现【开源免费】基于Vue和SpringBoot的购物推荐网站(附论文)
【开题报告】基于SpringBoot的美食制作学习网站的设计设计与实现
基于Springboot卖家乐二手电子产品回收系统(源码+lw+部署文档+讲解等)
基于springboot的C2C二手交易系统的设计与实现(源码+论文)
Java基于SpringBoot 的食物营养分析与推荐网站,附源码
【2024】基于springboot的健康饮食(膳食)网站课题背景、目的、意义
基于SpringBoot+Vue的个人健康管理网站的详细设计和实现
Springboot基于springboot的小区旧物交易系统的设计与实现j8o94(程序+源码+数据库+调试部署+开发环境)
172基于springboot的二手车交易系统的设计与实现

