树莓派上webDAV的搭建
烘焙蓝莓派:在派皮上均匀撒上糖和玉米淀粉,防止底部过湿 #生活技巧# #烹饪技巧分享# #国际美食制作#
树莓派落灰很久了,最近群晖又总是抽风,所以准备重新捡起来用。把之前群晖上的小东西移到这上面来
0.镜像烧录
这边有参照的教程,点击这里
工具的链接在这里
树莓派的镜像地址
1.连上树莓派
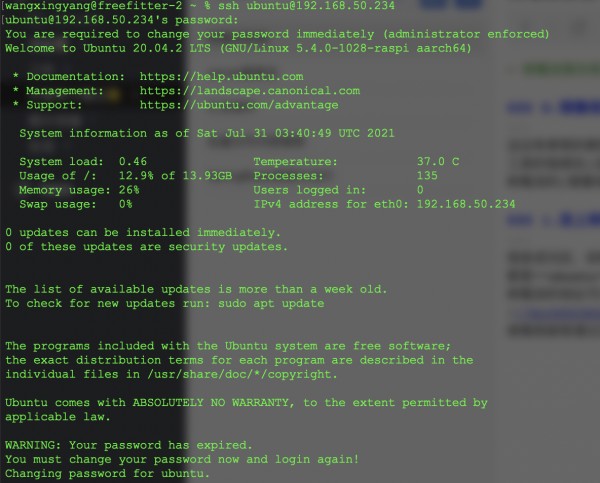
烧录成功后,给树莓派通电之后使用ssh连接到树莓派上。我烧录的是ubuntu server ,默认的用户名密码都是ubuntu
树莓派的地址可以从你的路由器中查看到。

路由器截图
接着就能够通过这个IP连接到树莓派了。登上了之后就需要修改密码,修改完成就行。

命令行截图
下面就可以开始操作了
2.换源
这是网上找的清华的源
shell
# 默认注释了源码镜像以提高 apt update 速度,如有需要可自行取消注释 deb https://mirrors.tuna.tsinghua.edu.cn/ubuntu-ports/ focal main restricted universe multiverse # deb-src https://mirrors.tuna.tsinghua.edu.cn/ubuntu-ports/ focal main restricted universe multiverse deb https://mirrors.tuna.tsinghua.edu.cn/ubuntu-ports/ focal-updates main restricted universe multiverse # deb-src https://mirrors.tuna.tsinghua.edu.cn/ubuntu-ports/ focal-updates main restricted universe multiverse deb https://mirrors.tuna.tsinghua.edu.cn/ubuntu-ports/ focal-backports main restricted universe multiverse # deb-src https://mirrors.tuna.tsinghua.edu.cn/ubuntu-ports/ focal-backports main restricted universe multiverse deb https://mirrors.tuna.tsinghua.edu.cn/ubuntu-ports/ focal-security main restricted universe multiverse # deb-src https://mirrors.tuna.tsinghua.edu.cn/ubuntu-ports/ focal-security main restricted universe multiverse # 预发布软件源,不建议启用 # deb https://mirrors.tuna.tsinghua.edu.cn/ubuntu-ports/ focal-proposed main restricted universe multiverse # deb-src https://mirrors.tuna.tsinghua.edu.cn/ubuntu-ports/ focal-proposed main restricted universe multiverse
3.安装webDAV
安装apache2服务:shell
sudo apt-get install apache2启用相关模块
shell
sudo a2enmod dav_fs sudo a2enmod dav sudo a2enmod dav_lock创建虚拟主机目录:
shell
sudo mkdir /var/www/sync sudo chown www-data:www-data /var/www/sync # 创建 Joplin 文件夹用作笔记同步 sudo mkdir /var/www/sync/Joplin sudo chown www-data:www-data /var/www/sync/Joplin/创建用户:
shell
sudo htpasswd -c /var/www/me.dav freefitter sudo chown root:www-data /var/www/me.dav sudo chmod 640 /var/www/me.dav配置虚拟主机:
shell
sudo vim /etc/apache2/sites-available/webdav.conf 在文件加入如下内容
xml
<VirtualHost *:50xx> ServerAdmin webmaster@localhost DocumentRoot /var/www/sync/ <Directory /var/www/sync/> Options Indexes MultiViews AllowOverride None Require all granted </Directory> Alias /webdav /var/www/sync <Location /> DAV On AuthType Basic AuthName "xxxx" AuthUserFile /var/www/me.dav Require valid-user </Location> </VirtualHost>
注意⚠️:
更换端口的话,需要在/etc/apache2/ports.conf 中修改
xml
# If you just change the port or add more ports here, you will likely also # have to change the VirtualHost statement in # /etc/apache2/sites-enabled/000-default.conf Listen 50xx <IfModule ssl_module>Listen 50xx </IfModule> <IfModule mod_gnutls.c>Listen 443 </IfModule>链接配置文件
shell
cd /etc/apache2/sites-enabled/ sudo ln -s ../sites-available/webdav.conf webdav.conf sudo rm 000-default.conf重启
shell
sudo service apache2 restart验证
浏览器中输入地址 http://192.168.50.234:5005/webdav/Joplin/就行了。
4.Joplin的使用
都是按照之前的配置去安装的,所以这一部分可以参看先前的文章操作即可。
网址:树莓派上webDAV的搭建 https://www.yuejiaxmz.com/news/view/661748
相关内容
树莓派选购与使用指南,资深网购达人的经验分享树莓派智能家居,如何在Raspberry Pi上设置Home Assistant
树莓派入门攻略:轻松学会用Python脚本开启智能生活!
树莓派家用自动化解决方案开发
让Linux融入生活! 自荐家用服务器折腾指南《树莓派防吃灰》系列
树莓派3+UWB雷达传感器模块=HST
基于树莓派的智能家居控制系统设计论文参考
树莓派打造智能语音控制系统
用树莓派DIY一个智能家居服务器
树莓派学习手记——使用Python录音

